
One of the hottest newcomers on the houseplant scene is the monstera deliciosa, also known as the swiss cheese plant or hurricane plant.
This plant makes a statement, and it’s everywhere. I’ve even seen it in clothing prints, on pillows, and in wall art!
They lend a classy tropical vibe to any space thanks to their large, beautiful green leaves.
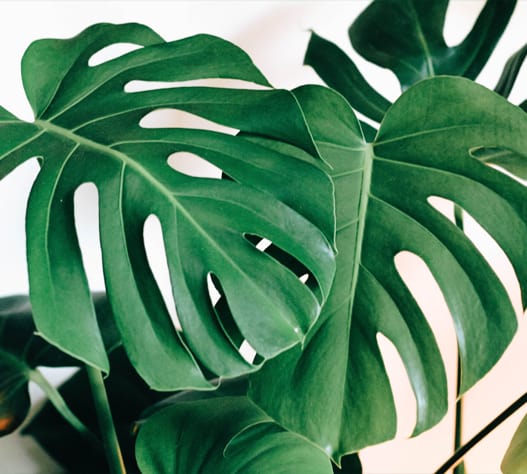
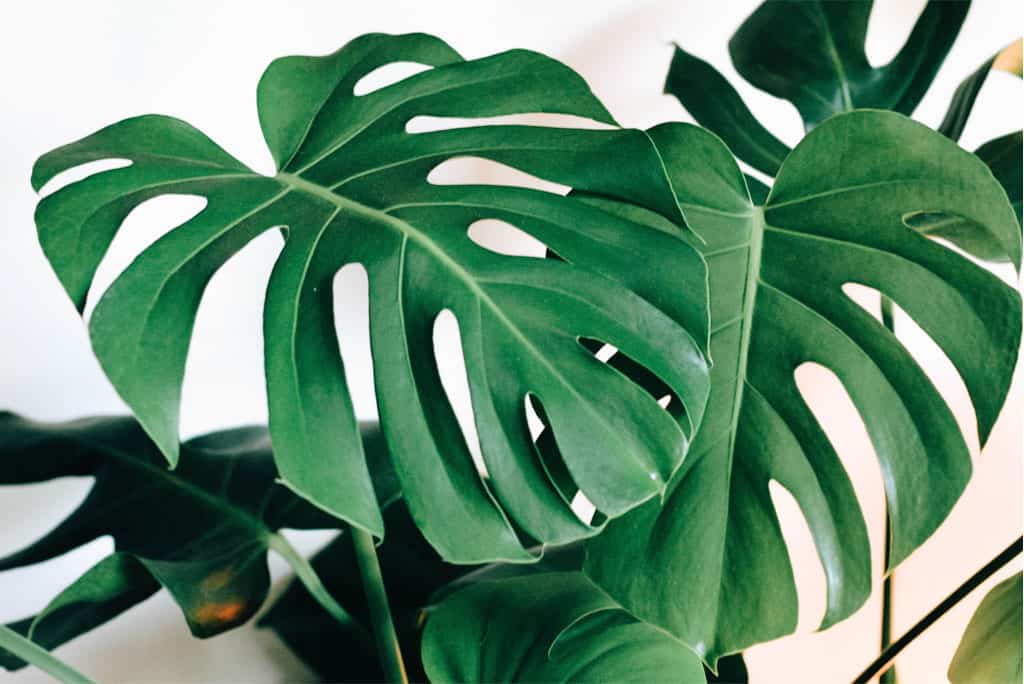
The most striking feature of this plant is that its larger, more mature leaves are full of holes!
Table of Contents
Where Monstera Deliciosa Comes From
The monstera plant is a tropical vine native to the tropical rain forests of Mexico and Central America. In the wild, they actually produce flowers and edible fruit that’s said to taste similar to pineapple! (Hence the deliciosa part of the scientific name.)
A relative of the philodendron and pothos, monstera loves to climb up trees and can grow quite large, even indoors.
The leaves of a monstera look like large palm leaves, except that they have holes! Newer, smaller leaves are heart-shaped and born whole, and then holes develop as the leaf grows and matures (this is where it gets its nickname as the swiss cheese plant). This is called fenestration.
Why Do Monstera Plants Have Holes?
There are plenty of theories out there, but no one knows for sure.
The holes may allow monstera plants to withstand heavy rain forest rains without sustaining damage to the leaves, or the holes might help them resist high winds from tropical storms (this is where they get the nickname of hurricane plant).
The most likely explanation is that holes in the leaves allow more of the rain forest’s dappled sunlight to reach the rest of the plant since plants that grow below the thick canopy must develop adaptations to receive more light.
Whatever the reason, we’re glad they develop these holes because they’re beautiful!
How to Care for a Monstera Plant
These plants aren’t particularly fussy, but they aren’t as laid back as, say, a snake plant. But there are a few tricks to keeping them healthy and beautiful.
Potting
Plant your monstera in a pot with well-draining indoor potting mix with a little extra peat moss mixed in. Use a pot with drainage holes and enough depth to add a stake, trellis, or moss-covered sticks the plant can climb. (Click here for how to make an easy DIY moss pole for your monstera.)
They can also grow outdoors in the shade in moderate to warm environments, but they’ll need something to climb like a fence or trellis.
Light
These plants can survive in low light, but they’ll grow much better and develop large leaves with holes in bright, indirect sunlight. Place a few feet away from a south-, west-, or east-facing window.
Water
Monstera plants don’t like to be too wet or too dry, so go somewhere in between. Keep an eye on the soil and water when the top 1-2 inches of soil gets dry. Don’t soak the soil, and don’t get the leaves wet; they don’t need a lot of water. (Read our ultimate guide to watering your monstera here.)
Humidity
These plants don’t like to be over-watered, but they love humidity! If you live in a dry climate, try placing the pot on a pebble tray or setting up a humidifier nearby. A moisture meter like this one can help you know when your monstera is thirsty.
Fertilizer
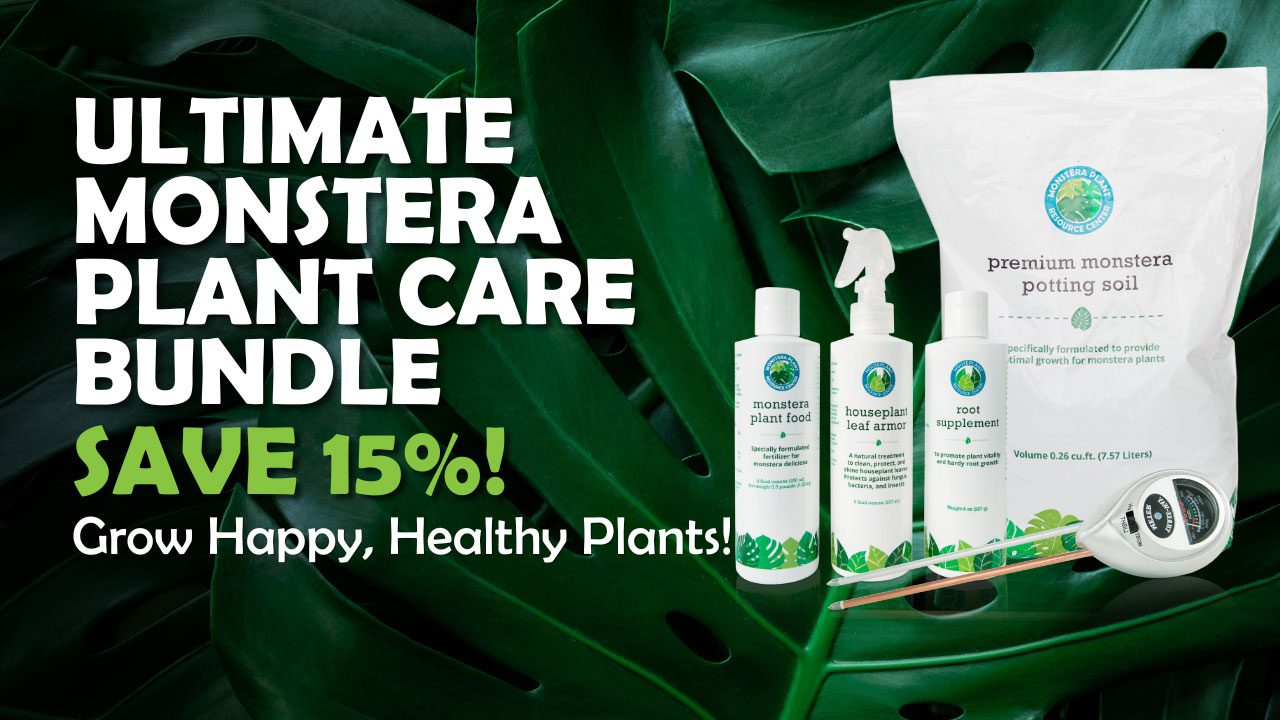
Monstera plants don’t need to be fertilized often, but adding fertilizer to your water during the spring and summer can encourage it to grow! I like to add a little Indoor Plant Food liquid fertilizer to my watering can each week. Give it a break during the winter and just stick to plain water. (Read about the best fertilizer for your monstera here.)
Pruning
This thing can GROW, so pruning is important to make sure it doesn’t take over your house. Only repot every two years or so, and cut back new growth when you don’t want the plant to get any bigger. (Be sure to use clean, sharp pruning shears!)
Cleaning
It’s also very important to keep your monstera’s leaves clean and pores clear so the plant can carry out photosynthesis unimpeded. Every week or so, use a clean, damp cloth to gently clean dust off the leaves. Or, better yet, use our Leaf Shine, which cleans, adds shine, and also protects your plant from insects, fungus, and bacteria!
What’s Wrong With My Monstera Plant?
The biggest problem people have with monstera plants is leaves that don’t develop holes. This is often an issue with light. If the leaves start to yellow, it’s probably getting too much light. If the mature leaves don’t develop holes, it’s probably not getting enough light.
You can also trim older, smaller leaves around the bottom of the plant to encourage it to grow larger, more hole-y leaves. (Click here for more troubleshooting tips.)
Is Monstera Toxic?
Monstera deliciosa is toxic to pets and humans, but don’t worry, it’s not fatal. Ingestion will only cause mouth and stomach irritation, and at worst, vomiting. Still, keep away from pets and children.
How to Propagate a Monstera Plant
If you want more monsteras, good news! These plants propagate very well as long as you cut in the right place! And if one cutting doesn’t work out, try again with another.
For even better success with propagation (especially with stem cuttings!), try our Propagation Promoter to stimulate healthy root growth!
The best time to do this is in the spring or summer when monsteras tend to grow. There are generally two methods for propagation: cutting and air layering.
Propagation with cuttings:
To take a cutting, cut off a leaf just below a node (the area where a leaf meets a stem). If you can find a node with an aerial root on it, all the better! Cut just below the node so that the node is on the piece you cut off. Make sure to use sharp, clean shears so you don’t spread bacteria that could harm your plant.
Place the cutting in a jar of water of filtered water (or you can leave tap water out overnight so the chlorine can evaporate). Every few days, change the water and give the roots a gentle rinse. You should start seeing some new roots in a month or so! When you start seeing roots, plant it in soil.
Air layering method:
The good air layering method encourages new roots to grow before you take a cutting so you can plant it directly in soil instead of keeping it in a jar of water.
To air layer, find a node with an aerial root growing just below it. Cut a small notch just below the root, and wrap that notch, the root, and the node in a thick layer of sphagnum moss, then wrap the whole bundle in plastic wrap. Use string or twist ties to secure the moss and plastic.
You’ll want to keep the moss moist, so water the moss with a spray bottle every day or so until new aerial roots start poking out of the moss (this might take a few months). Then you can cut the stem under the node and pot the cutting in soil.
Make a Statement
Try one of these large, beautiful plants to bring life and big personality to any room! These are more of an intermediate houseplant, but you might find them pleasantly easy to care for and a lot of fun to raise!
To learn more:
- Sign up for our free Ultimate Monstera Webinar.
- Subscribe to our newsletter.
- Click to join our community on Facebook: Monstera Plant Resource Group.
- Read our Ultimate Monstera Watering Guide here.
- Be sure to grab your essentials here: Houseplant Propagation Promoter, Monstera Plant Food, 3-in-1 Moisture Meter, Premium Potting Soil, Houseplant Leaf Armor (which protects your houseplant from bacteria, fungus, and insects—and also cleans and adds shine to its leaves!)
- Looking to shop for plants online? Our trusted partners at Houseplantshop.com grow high-quality plants here in California and ship directly to you. Shop online now!