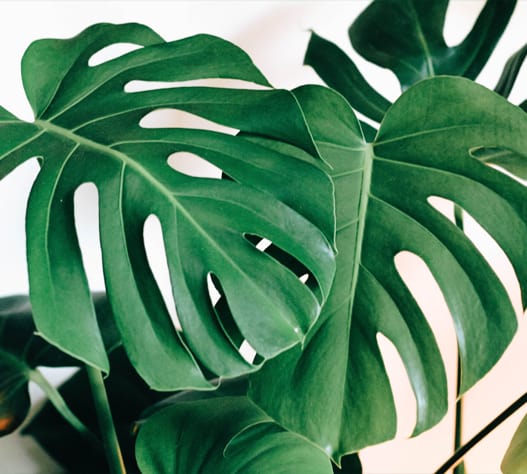

Monstera plants are stunning additions to any indoor plant collection, and they’re quite easy to propagate! In this article, we’ll show you different methods for propagating a monstera plant at home so you can grow your collection or give amazing gifts to your plant-loving friends!
(Side note: Don’t miss this guide on how to host a monstera propagation party!)
There are many different ways to propagate a monstera plant. In this article, we’ll walk you through a few different propagation methods and share our top tips for growing the healthiest baby monsteras possible!
Table of Contents
How to Propagate Monstera
There are a few different ways to propagate monstera plants. The easiest way is by taking cuttings, but you can also propagate with air layering, separation, or even growing brand-new plants from seeds!
The method you choose will depend on the size and age of your monstera and your personal preferences. Some people really enjoy growing plants from seeds while others prefer to use cuttings or separation.
You might also find your monstera getting out of control and decide to separate it or prune it and propagate the cuttings!
There are best practices for each method and different tricks to use to increase your chances of producing a healthy plant from your propagation efforts (because propagation is never a sure thing). It’s important to consider timing and to take steps to protect your vulnerable plant from shock and infection after taking a cutting, separating, or air layering.
Once you know what to do, propagating is actually very fun and fulfilling!
When to Take Monstera Cuttings
The best time to take a cutting from your monstera to propagate is in the spring and summer when your plant is most likely growing. When you have a healthy, young leaf with a node nearby, the time is ripe to take a cutting!
What Part of Monstera Plant to Propagate From
You can propagate a Monstera deliciosa with several different methods and several parts of the plant. This can include nodes, aerial roots, or even seeds! Let’s walk through each of these parts of the plant to understand their potential role in propagation.
Seed
While it’s possible to propagate a monstera plant from seed, of course, you can only harvest the seeds from a fruiting plant.
Monstera deliciosa produces the Mexican breadfruit, which is edible (and actually pretty good!), and the seeds are actually embedded in the fruit. However, Monstera deliciosa almost never produces fruit inside, so this might not be the best way to propagate an indoor monstera. Though if you have a fruiting plant outdoors, by all means, snag those seeds!
You can also purchase monstera seeds and germinate them as you would any other seed. Watch out for scams, though. Make sure to read independent reviews and ratings of any seller you’re considering purchasing seeds from to make sure they have a good reputation for sending out quality products.
Online stores may have seeds, and you might also find them on eBay and in Etsy shops. You can expect to pay $1-$2 per seed. If you have the patience and the equipment already, this can be a cheap way to grow some gorgeous monstera plants!
(Warning: We don’t recommend buying alleged variegated monstera seeds. This is because it’s impossible to tell if a monstera seed will actually produce a variegated plant, even if they were harvested from a plant with variegation. The only way to guarantee variegation is to purchase a cutting from a variegated plant.)
If you do get your hands on some legit monstera seeds, here’s what to do:
Step 1: Prep
Start your seeds as soon as you get them because they aren’t viable for long after they’re harvested from the fruit. Soak your seeds for 12-24 hours before planting in lukewarm water, and leave the seeds somewhere warm.
Step 2: Plant
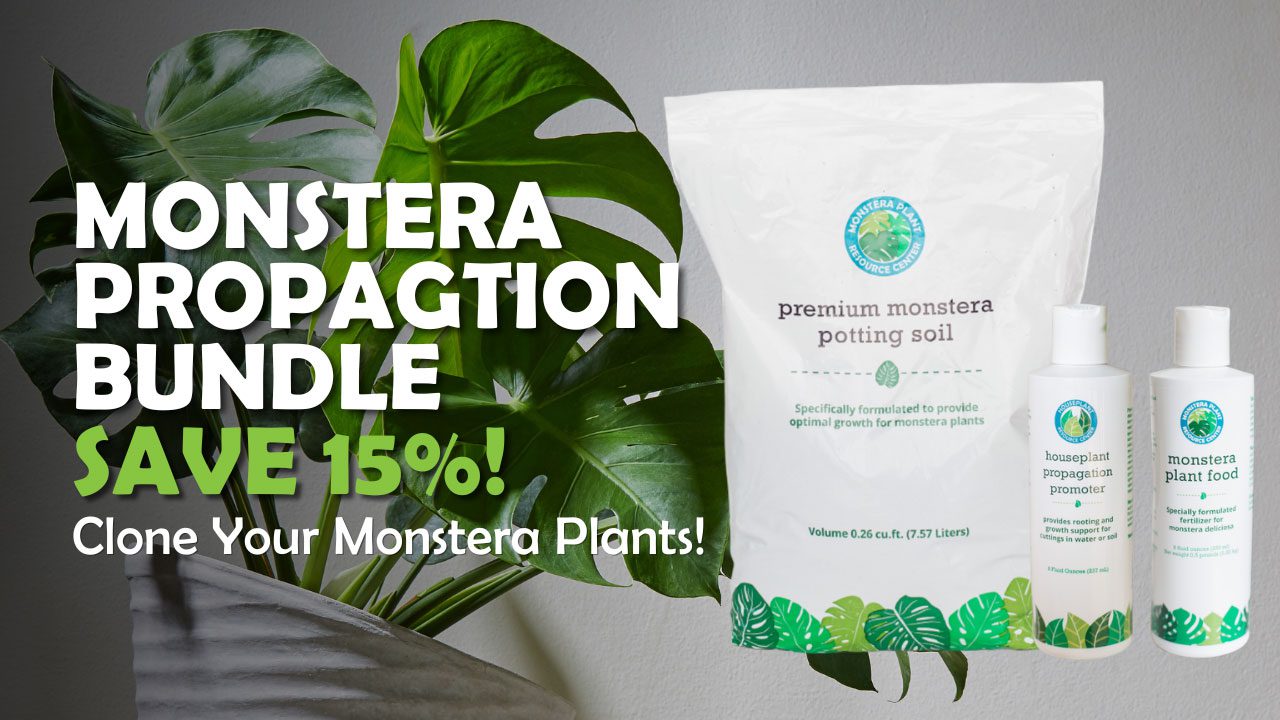
Place some soil in a shallow container and poke a small hole in the medium. Insert the seed, bury it, and water thoroughly. (Tip: You can mix some liquid rooting hormone products, like Propagation Promoter into the water to stimulate the germination process!)
Step 3: Cover and Wait
Be sure to keep your seeds warm, at least 70 degrees Fahrenheit, and cover with a clear, plastic covering to keep the humidity levels around the seeds high. Keep the soil damp and keep it in a place with moderate light to give the seeds some energy without scorching them.
It’s a good idea to keep your seed starts on a heating mat to speed up the germination process.
If you want to streamline this whole process, you can purchase complete seed starting kits so you’ll have everything you need!
Aerial Root
If your monstera plant has aerial roots, that’s great news for your propagation efforts! Aerial roots grow near nodes, so including one in your stem cutting or air layering near an aerial root will give your plant a head start on growing new roots.
If you have a really good aerial root on a stem with some healthy new leaves, air layering might be a good method to try because your chances of success are higher due to a lower risk of shock and infection.
To do this, you’ll need a few supplies:
- Sphagnum moss
- Plastic wrap
- String or twist ties
- A spray bottle filled with clean (preferably distilled) water
- Optional: liquid rooting hormone such as Propagation Promoter
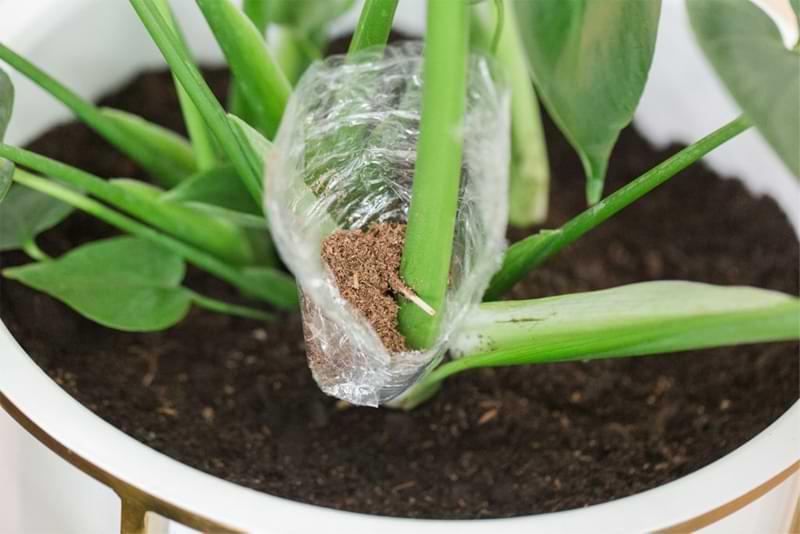
To air layer, locate a node or aerial root on your monstera plant right below the leaf you want to propagate. (It should look like a little brown bump or growth on the stem on the opposite side of a leaf.)
Use a sharp, clean knife or pruning shears to make a small cut in the stem near the node. This little wound will prompt the plant to direct energy to that area so new roots will grow! If you’re using liquid rooting hormone, use a cotton ball to dab a bit on the cut to kick-start root growth.
When you’ve made your cut, wrap the cut, node, and stem in dampened (but not soaked and dripping) sphagnum moss, then wrap the wad of moss loosely in plastic wrap so that there’s still a bit of airflow. Secure the whole thing with string or twist ties.
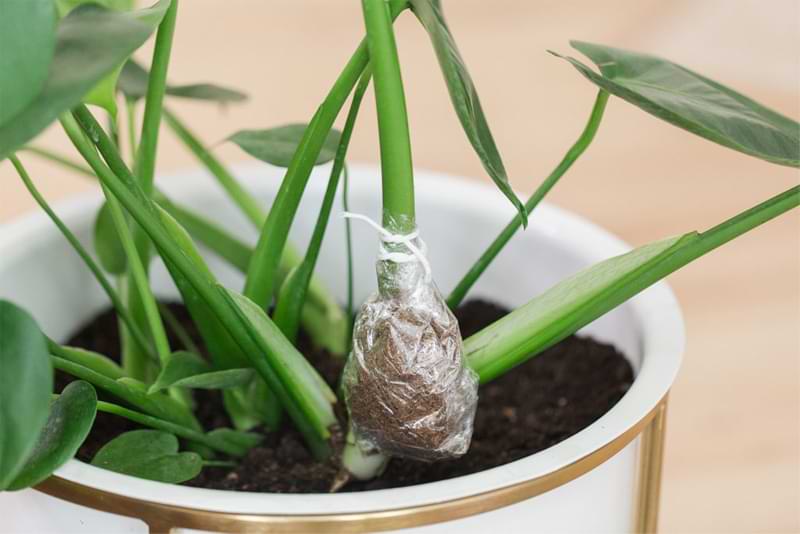
Every couple of days, loosen the plastic wrap and spray the moss with water to keep it damp.
Within a few months, you should see brand-new aerial roots growing around the area!
When the roots are an inch or two long, take off the moss and plastic and cut that section of stem and leaves off the plant (make sure to include your new roots!), and plant in a pot.
Ta-da! You have a brand-new monstera plant! Care for your new plant as you would a mature monstera.
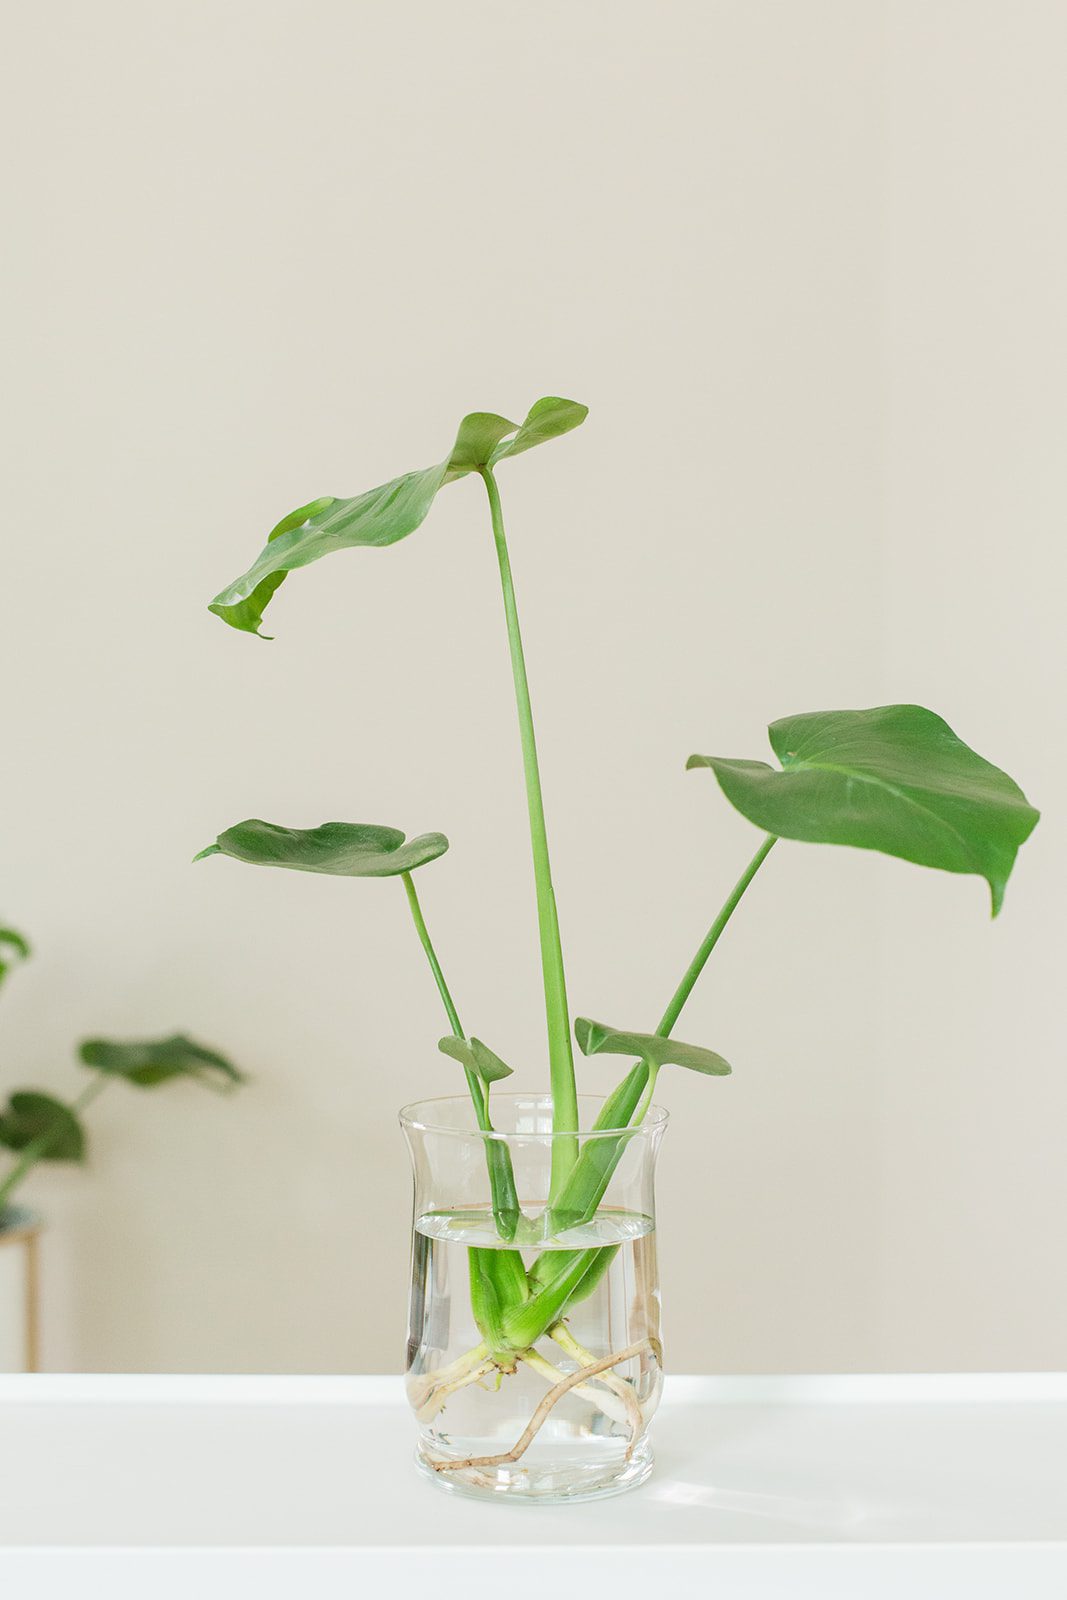
Stem Cutting
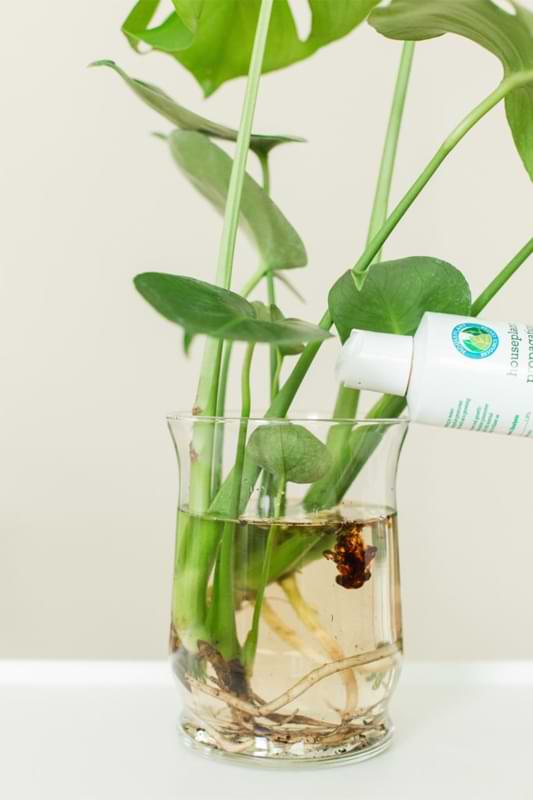
The most common way to propagate a monstera plant is with stem cuttings. This involves actually cutting off a piece of the plant and encouraging it to grow its own roots so it can be planted.
To do this, locate a healthy, growing section of your monstera plant with at least one healthy leaf and a node. With a clean pair of shears, cut the section off the monstera, including the node. (You can also propagate healthy leaves with nodes that you pruned off your monstera to control its size.)
Place the cutting in a clear glass of clean water with a little Propagation Promoter and put it in a bright place. Change out the water at least once a week and be patient! Within a few months, you should have roots. Once those roots are an inch or two long, you can plant your monstera in soil.
If you have trouble keeping your cuttings upright in their container or medium, you should try these easy-to-use node holders! This handy propagation tool is a simple way to keep root cuttings healthy and in place while they take root, which gives those roots more room to grow without the added pressure of supporting the plant’s weight. This plant node support also helps your cuttings root faster!
You can also plant your fresh cutting directly into soil. Place the pot in a bright place and keep the soil damp. You can mix a little liquid Propagation Promoter into the water to ward off pathogens and give the new roots a boost of nutrients.
While this is a more simple method, we prefer rooting cuttings in water because there’s less chance of infection. Plus, you can get to watch your new baby roots grow!
Leaf Node
This is the single most important part of propagating a monstera plant, because nodes are where the new roots will grow. Whether you’re propagating with a cutting or air layering, you’ll need a node. While aerial roots and nodes are related, you don’t actually need an aerial root to propagate. Just a node!
In fact, it’s possible to propagate from a stem with a node even if there’s no leaf! Your chances of success are slimmer here, but a stem with a node can take root and start growing new leaves. It’s all about the nodes!
Can You Propagate a Monstera Leaf?
Nope. In order to propagate your monstera plant from a leaf cutting, your cutting MUST include a node because that’s the point from which new roots will grow. If you try to propagate a leaf from a node, it won’t take root. You’ll just have a pretty leaf in a jar of water, which can be pretty and last for a while, but you won’t be able to propagate.
Encourage Successful Monstera Propagation
Unfortunately, propagation is never a sure thing. You’re essentially rolling the dice every time you take a cutting, sprout a seed, or cut a stem for air layering. Even separation isn’t foolproof due to the risk of shock.
Luckily, there are steps you can take to encourage roots to form, prevent disease, and minimize shock. Here are some tricks to help you improve your luck and stack the propagation odds in your favor.
Helping Monstera Cuttings Establish
The best way to help your cuttings root is to take your cutting at the right time of year (spring and summer) when the plant is already growing. When the plant is experiencing a growth spurt, it can overcome shock more easily and continue growing after it’s cut.
A rooting hormone can also speed things along by encouraging your cutting to take root while protecting it from infection.
Make sure to use a clean glass vessel for your cutting and clean water to minimize the risk of waterborne pathogens causing disease.
If you root your cutting in soil, try to use new soil that drains well, and check it for mold before using it for propagation. (Which you should be doing anyway, but especially in this case.)
Time of Year
Propagating at the right time of year can make all the difference! Spring and summer are the growing seasons for most tropical plants, including monstera. It is possible to propagate successfully year-round, especially if your indoor conditions are pretty consistent throughout the year, but the spring and summer are your best shot for healthy propagation.
Patience
One of the toughest parts of propagation is the waiting! It can take several months for new roots to grow on your cuttings or for your seeds to sprout.
It’s tempting to constantly mess with your cuttings and seeds and change their conditions to attempt to get them to grow faster, but don’t! The best thing for new cuttings and seedlings is time and consistency. Keep changing your water weekly, keeping the soil damp, etc., and be patient!
Light Conditions
Plants need energy to grow, and they get energy from sunlight!
If you propagate with separation, cuttings, or air layering, make sure to give your plant plenty of bright, indirect sunlight to provide lots of energy to recover from shock and keep growing!
If you’re starting a monstera plant from seed, you might want to look into special grow lights for seedlings. Bright light can scorch delicate new sprouts, and sometimes the right balance of light for seedlings can be tricky! Bright light is good, but go for lighting conditions a little less bright than what you’d provide for a mature plant. Grow lights meant for seedlings provide a good balance. (Or just jump in with both feet and invest in a seed starting kit.)
Temperature & Humidity
Be sure to keep your cuttings and seedlings fairly warm. They’re less tolerant of cooler temperatures than mature plants, so keep temps between 70 and 80 degrees Fahrenheit.
Cuttings and seedlings also need plenty of humidity.
Place a loose plastic covering over seedlings so their respiration will create more humidity near the soil.
Cuttings will be happy in a bright, steamy bathroom, or you can set up a humidifier nearby. If you root your cuttings in water, the evaporation will also create some humidity around the cutting. (This is another reason why we prefer rooting in water before planting!) If you’re rooting them in soil, a humidifier or pebble tray/humidity tray can help keep your cuttings happy.
Soil Moisture Level
Freshly planted cuttings require higher soil moisture than mature plants. Be sure to water if the top inch of soil feels dry or when a moisture meter reads 4. It’s also important that your pot and soil drain very well to prevent standing water and root rot!
We recommend checking your cuttings or newly established monstera plants daily to monitor the soil level and water as needed. (Top or bottom watering work well here.)
Propagation Medium
When you propagate from cuttings, infection is always a risk. Rooting cuttings in water tends to be more sterile than using soil, so this is what we prefer and recommend. (But you can absolutely get great results by rooting in fresh, clean soil.)
Make sure to use clean water and change it out every week. It’s also a good idea to start with a very clean vessel and clean it when you change the water to remove any buildup or pathogens that could harm your delicate cutting.
If you’re rooting in soil, use a light soil mixture that drains well. Monstera Potting Mix is a perfect choice.
Hormone Rooting Powder
Rooting hormone can help stimulate root growth in cuttings and increase your chances of successful propagation. Many rooting hormones also protect your cuttings from infection from fungus or bacteria.
Most rooting hormones come in powder form, though you can find some in liquid form as well. Our Propagation Promoter is a liquid so you can mix it into your water with your cutting, dab it onto the rooting site when air layering, or dilute it to water your seeds or cuttings rooted in soil.
A liquid or powdered rooting hormone can make a huge difference in your propagation efforts. Give it a try!
Potting Up Monstera Cuttings
One of the questions we see most often about propagating monstera cuttings is when and how to pot the rooted cuttings. After all, you don’t want to wait months to see new roots on your cuttings only to have them die when you finally pot them!
Our advice: Don’t overthink this part. You can plant your cuttings as soon as you remove them from the plant so they can root in the soil. If you’re rooting your cuttings in water, you can plant the cuttings when the roots are an inch long. Once the cutting is planted, care for it like you would a mature monstera plant. Remember, consistency is key! Don’t fuss over your cuttings and love them to death by overwatering or changing their conditions frequently. Pick a routine and change it ONLY if your monstera plant is showing immediate signs of stress (like brown spots on the leaves or stems).
Potting Soil Mix
Choosing the right potting mix is crucial for the health of your monstera propagations and your mature plants!
The most important thing is to choose a mix that drains well so your plants aren’t sitting in soggy soil. Monstera plants do best in a light, chunky soil mix with a pH of 5.5-7.
We love this recipe for aroid soil, but if you’re not in the mood to make your own potting mix, we highly recommend our Monstera Potting Soil for your mature monsteras and propagations. It’s the perfect balance of water retention, drainage, and nutrient density to help your monsteras grow into healthy, beautiful plants!
Pot Size
It’s tempting to plant your cutting in a larger pot to give it room to grow, but don’t! Plant your cutting in a smaller pot that will give it a little room to grow, but not a lot. A larger pot can hold onto more water than your plant can use, which increases the chances of overwatering and root rot. Not good!
You’ve Got This!
Monstera propagation might seem complicated at first, but it’s actually a lot of fun once you get into it and understand what you’re doing! Monsteras tend to propagate fairly easily, so your chances of success are pretty high, even if this is your first time and you don’t do everything perfectly.
The only way to get better is to get started and learn as you go!
We’ve got all the information and resources necessary to grow healthy and beautiful monstera plants.
Check out these resources to become a monstera expert in no time!
Monstera Plant Resource Facebook Group
Free Monstera Plant Care Webinar
Supplies:
Articles:
Monstera Plant Food: Fertilizer for Your Monstera Plant